
After a chemical release, community members sometimes notice that substances have collected on the rooftops or walls of their homes or other buildings, surfaces of their automobiles, or windowsills, or other surfaces inside of their homes. “Wipe sampling” is a procedure for collecting those substances and determining what chemicals are in them.
| WARNING: Wipe sampling involves exposure to Dichloromethane, which is listed by the State of California as a known carcinogen. Although the exposure is likely to be small, chemically-sensitive individuals should not take wipe samples themselves. You may want to hire professionals to perform the sampling. People who do take samples should wear rubber gloves and make sure that the area is well ventilated in order to minimize their exposures. |
When should a wipe sample be taken?
It makes sense to take a wipe sample when:
- You can see deposits of chemicals on surfaces;
- The surface area is a significant size
- You expect that the deposited chemicals include metals and/or heavy organics, such as Polynuclear Aromatic Hydrocarbons (PAHs). (This is because these are the categories of chemicals for which we’ve identified a wipe sampling test method. We haven’t yet explored wipe sampling for others).
What does it cost to take a sample?
Just like bucket monitoring, the main cost of wipe sampling lies in having the samples analyzed. The following table shows the costs for different tests. Bear in mind that each laboratory test requires a separate sample, so if you want to test for (for example) PAHs and metals including mercury, you would need 3 samples. To get three samples, you need either three surfaces or a single surface big enough to be divided into three sizable pieces.
|
Analysis for: |
Costs (about): |
| Each metal |
$30 |
| Range of metals (~20; excludes mercury) |
$175 |
| Mercury |
$30 |
| PAHs |
$200 |
Where do I get my samples analyzed?
You need to locate an analytical laboratory that can analyze wipe samples. If you already have a laboratory that analyzes your bucket samples, the best approach is to check with them to see if they also handle wipe samples. If they don’t, they should be able to suggest other laboratories that do. Otherwise, you should try asking around at universities and government agencies or looking in your local yellow pages.
How do I take a sample?
Getting started
Your laboratory should be able to provide you with sterile pads and jars. (If they don’t, look for another lab.). When you are getting ready to take a sample, call the lab and ask for supplies. Tell them how many samples you’re planning to take, and they will send you a kit with sterile pads, sterile jars, wipe solutions, and chain of custody forms. You should end up with enough supplies for twice as many samples as you think you will take, because you need to submit one “field blank” for each test along with your sample(s).
Packing up
Before you head out to take the sample, make sure you have the following:
- The wipe sampling kit from the lab (including jars, pads, and wipe solutions)
- Small cooler (also from the lab) filled with ice
- Chain of Custody form and Sampling Location/Size form
- Rubber gloves (unpowdered)
- Ruler or tape measure
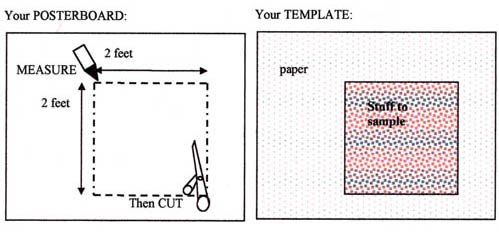
- Large sheet of paper or posterboard (to make a template)
- Scissors
Taking the sample
- Identify an area to wipe for each sample that you want to take. Remember: the larger the area, the better chance you have of getting results. Measure each area carefully. Record the measurements of the area and a brief description of it on the “Sampling Location/Size” form. When recording measurements, be sure to specify the units you’re measuring in, for example, inches, feet, or centimeters.
Note: If you are taking multiple samples and have ample surface area to work with, it may be helpful to make all of the areas the same size. To do that, decide how big you want the area to be, then cut a hole in your posterboard of that size. For example, if you have three large surfaces, and the smallest of them is 2 feet wide and 2 feet deep, measure out a 2-foot square on your posterboard. Cut it out. Then lay the posterboard with the 2×2 hole in it on top of your surface. The exposed area is what you’ll wipe.
- Once you have the area to wipe, put on a clean pair of rubber gloves. If you are taking multiple samples, you will use multiple pairs of rubber gloves.
- Take out a sterile gauze pad. If this sample is for metals, moisten the pad with acetic acid solution (marked “metals wipes” in sampling kit). If this sample is for PAHs, wet the pad with acetone/dichloromethane solution (marked “PAH wipes” in sampling kit).
- Wipe the surface with the moistened pad. Work from the outside edges of the surface and work in concentric circles toward the center. Apply firm pressure as you wipe. The purpose of this is to get the dust and residue from the surface onto the wipe sample. Do not rub so hard that you break up the material of the surface that you are wiping; flecks of paint from your windowsill, for example, will contaminate your sample.
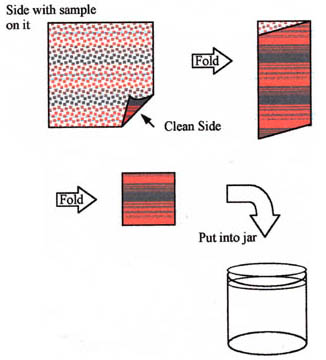
- When you are finished wiping, be careful not to let the pad touch any other surface. Fold it in half so that the side that you wiped with is to the inside. Fold it in half again. Put the pad into a sample jar, and screw the lid onto the jar.
- Fill out a label for the jar with the date, time, sampling site, sample number (when multiple samples are taken), and samplers name. Put the label on the jar. Place the jar immediately into the ice-filled cooler and close the cooler again so that the sample and ice stay cold. Then make an entry on the Chain of Custody/Lab Analysis Request Form with the date and time and the sample number from the Sampling Location form.
- Prepare a field blank (a “blank” sample where no chemical materials have been collected).* Repeat each of the steps above, starting with Step 2, but leave out Step 4. In other words, put on a new pair of gloves. Take out a new pad and moisten it with the same solution you just used. Do not wipe any surfaces. Fold the pad and put it into a jar. Label the jar, and write “FIELD BLANK for SAMPLE # __” in the “sampling site” space. Doing this sending the lab a blank pad that you’ve handled exactly the same way that you’ve handled the actual sample is a way to verify that you didn’t contaminate your sample in any way. Remember, you will need one field blank for each test requested.
- Repeat these steps for each sample you want to take. When you’ve taken all the samples, make sure the top part of the chain of custody form is filled out and sign it.
- Make sure that the samples are packed securely into the ice-filled cooler. The samples should be about 40 degrees F (the temperature of the inside of your refrigerator) when they reach the laboratory, so you should ice them as though you were icing down drinks for a hot summer day. You should also check to see that the sample jars are not in any danger of breaking in transit to the lab.
- Send the samples, with the chain of custody record, to the laboratory by overnight mail. It is important to ship the samples immediately following collection so that they can be received and analyzed within 14 days. You should expect to wait 3-4 weeks for results.
*When the field blank is tested in the laboratory, the results should be negative. If chemicals are detected in the field blank, this indicates that the sampling method has been accidentally contaminated. Using a field blank provides a Quality Assurance method to make sure that your sampling materials are pure, and that the only chemicals collected were from the area you want to sample